 Printwear & Promotion The Total Promotional Package
 Special effects on garments change as quickly as fashions and screen printers need to be able to reproduce the ‘latest’ effects in a production environment, to a deadline and profitably. William Shorter, product manager at CPS and Liam Stubbings, director of Pyramid Textiles explain the essential processing steps of high build screen printing.
One of the special effects that can lead to some head scratching and ‘how should I approach this?’ is high build printing with plastisol inks. Done properly with the right know how, screens can be produced and printed using existing equipment and processes – but we have also seen cases where the demand for high build prints has ground the production process to a halt.
So, what are the processing steps for achieving high build prints and how can you achieve the results the customer is looking for?
1) Emulsion selection
Creating high build effects can’t be done with every emulsion in the marketplace, so what key properties should you look for?
In the same way that you will require a high build ink to create high build effects, you will also need a high viscosity emulsion with a solids content of greater than 46% to create the required stencil. Also, as you are likely to be creating a build on the mesh of 150 to 250 microns it will need to be a fast exposing photopolymer emulsion, otherwise you are going to be exposing that screen all day.
2) Mesh count
Depending on what you are trying to achieve, you would typically select a monofilament polyester mesh of 43 threads per cm or lower.
 3) Coating
Some guides on high build printing recommend wet on dry coating to create high build stencils with an emulsion, but beware this is a very lengthy process and especially so if you haven’t selected the right emulsion.
With the correct emulsion you can easily create high build stencils with wet on wet coats using a cold fan to ‘skin dry’ the emulsion during coating. The technique is far easier to see demonstrated, so we recommend one of the ‘how to guide’ type tutorials that are now available online.
4) Drying
There is a temptation to use high temperatures to dry the screen as quickly as possible. However you must be aware of the likely consequences of this, from a slow, difficult washout and a loss of resolution to, in severe cases, the stencil being completely insoluble and not able to wash out at all. Therefore we recommend a maximum drying temperature of 35°C and relative humidity of less than 50%.
5) Processing/ exposure
Like the coating process, this is going to be very experimental and exposure times are going to be significantly increased in comparison to normal processing times. As a rule of thumb, you should expect a high build stencil (200 micron OEM) to require four to five times longer than the same emulsion coated with 20 micron OEM.
Stencil wash out should be short and sharp, never pre-soak the screen as this will soften it too much. Also, we advise that the majority of the washing out is carried out from the print side using a strong water spray, especially if the stencil has been under exposed.
6) Inks
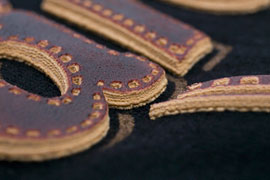
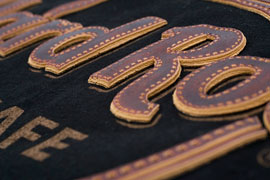
The ink should ideally be a high density plastisol, as this will guarantee the edge definition of the print and allow you to build on the profile of the ink between flash drying, and create the effects as seen in the picture.
7) Printing
With high build printing you will typically need a soft, 65 shore rounded squeegee. To create the perfect print there are two proven printing techniques and we recommend that you experiment to find the best technique for you:
i) Double flood to get the ink to fill the mesh and emulsion openings of the very thick stencils.
ii) Avoid flooding completely as this can also achieve a good separation of the ink from the mesh.
As you can see two completely opposing printing techniques but both have proven to work. It’s all about running tests to establish what is right for your printing needs and workshop.
8) Curing
When printing plastisol inks, the temperature of the dryer and the length of time the print is in the dryer are of paramount importance. The ink needs to be in the dryer for a minimum of 90 seconds at 180°C. Always double check the temperature that the garment reaches by periodically using temperature strips. Never rely solely on the reading of your dryer being accurate, especially if it hasn’t been calibrated or serviced recently.
9) Wash test
The only viable method to ensure that your garment has been successfully printed and cured is to test it yourself. To do this, take one of your printed garments and wash it at the recommended temperature and check that your image remains as you would expect.
 Summary
With the right knowledge, approach and refinement of best printing techniques you should be able to confidently accept jobs requiring high build effects, knowing that you can deliver them to the quality required by the customer and make a profit. Perfecting a range of ‘specialist’ print techniques will give you a competitive advantage and more work should come on the back of this.