Students studying Textile Design at the School of Fashion and Textiles at Birmingham City University regularly get experimental with two printers from Epson’s SureColor series. P&P editor Melanie Attlesey spoke to Kelly-Marie Sifleet, senior technical demonstrator, and two of her students to find out more.
Located in the purpose-built brand new Parkside Building deep in the heart of Birmingham is the School of Fashion and Textiles. The Textile Design course enables students to combine traditional craft with new technology skills and approaches to design. Students past and present have been known to design wallcoverings, fashion, interior furnishings, stationery and more. All of this is made possible through the use of Epson’s SC-F2000 and SC-F6000 printers.
DTG printing
The SureColor SC-F2000 is described by Kelly-Marie as a ‘brilliant buy’. This printer was Epson’s first foray into direct to garment printing. This printer lets students print directly onto a wide variety of fabrics, at the same time as getting truly experimental.
“This machine allows students to sample their designs on pretty much anything they want to. We do use the machine as a real experimentation, an innovation development piece of kit and students find the machine the most exciting of all the printers we have because I allow them to use their screen printed fabrics in and digitally print over fabrics that have not only been printed with pigment dye, but with flock, metallic, foil and puff. We have really seen some exciting results,” says Kelly-Marie. “The students love the double strike print setting in particular. With this setting we have had some beautiful tonal work. And the changeable height setting allows students to work with stencils on top of their fabrics.”
This printer was installed in the department in July 2015 and was purchased from Macclesfield-based R A Smart. On a visit to the company’s showroom last summer, R A Smart’s managing director, Magnus Mighall showed Kelly-Marie some impressive looking samples and she was instantly smitten with the printer and the quality of the prints produced.
Dye sublimation printing
The second Epson printer in the department is the SC-F6000, which Kelly-Marie says is very popular among the students. It was a visit to Printwear & Promotion LIVE! in February 2014 that inspired Kelly-Marie to invest in the printer. “Before we had the SC-F6000 we had a much smaller sublimation printer, but it limited us to size and wasn’t very popular with students. I visited the show and could see that sublimation printing was something that we should invest in. I love the endless possibilities with this machine,” she adds.
Purchased in November 2014, the SC-F6000 is used alongside the department’s flatbed heat press, the Transmatic TM150. “This printer enables students to print on more than just polyester, we have seen students print onto glass, aluminium and much more. Students love working with this machine because it comes at an affordable price for both printing and material,” says Kelly-Marie.
The fabric that students use in their work is purchased from Whaleys in Bradford, a specialist wholesaler of fabrics. This company has invested heavily into its synthetic fabrics and as a result students are now seeing very good results when printing onto this type of fabric.
Although Kelly-Marie says both printers are very simple to use, they aren’t without their limitations. She explains the Parkside Building is naturally very warm which was causing the ink to block, but now they make sure the printers are cleaned once a day to resolve this problem. Kelly-Marie also adds that the SC-F2000 is limited on size, but the Mimaki JV33 and the Mimaki TX2 they also use in the department makes up for this when students wish to print larger pieces of work.
Kelly-Marie has worked with R A Smart for a number of years now. She says: “When the printers were delivered the technician inducted me onto the machinery and then spent plenty of time with me to ensure I knew how to clean the machines properly and to ensure I could use the printer comfortably. The after-purchase support has been very good. Any consumables we have needed they offer a speedy delivery and any issues are usually dealt with within a day. It is a great company to work.”
Garment decorators may also wish to get experimental with the settings on their printers to develop interesting pieces of textile design, to which Kelly-Marie offers the following advice: “Being experimental with the printers is fabulous, but please remember to keep on top of printer maintenance. Take time to experiment with the settings and to fully understand what each setting means.”
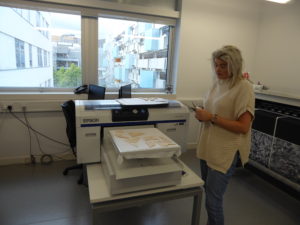
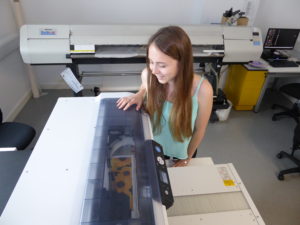
Amelia watches the first stage of her design come to life
Second year student Amelia Frost talks through how she used Epson’s SC-F2000 to create her latest design on a heavyweight cotton.
Using the SC-F2000 printer means that anyone can experiment freely. Studying Textile Design at Birmingham City University pushes me to use innovative techniques to create interesting samples of work. The printer can print onto materials up to 16x18in, which is great for using found materials and exploring the different ways materials will react to digital printing. For the piece I am working on, I chose to print on a piece of heavyweight cotton. The SC-F2000 works best printing onto natural materials; although you can still print onto synthetic materials you won’t receive the same clear results.
Step 1
To attach the material there is a platen for you to place it onto. Being acrylic means you can tape anything onto it without damaging it as well as any over-printing from the fabric being easy to wipe off. Underneath the printing platen is a simple mechanism to change the height of it by simply twisting the handle meaning you can put different thicknesses of materials through the printer. The closer the fabric is to the printer the better the print, printing from far away will mean the ink is likely to spray a more uneven layer causing a blurred image.
Step 2
The digital programme, Garment Creator, which is where you upload your JPEG or PNG digital file is simple to use. You simply upload your image onto the programme and adjust the size accordingly. The screen offers a grid so you know where on the fabric it will be printed and how much space is left around it. Once uploaded, there are many options for you to explore to change the print quality. The options include: print quality, print options, ink density and colour settings. Within these categories you can change each of the simple slide options to work out which is the best print option for you. This is what makes the SC-F2000 so versatile. I chose to print using a slow speed so that the quality was high with the option of double strike. This option prints the pattern twice with a pause of your desired amount, the longer you leave it the more the ink will dry giving your print a better finish.
The SC-F2000 can print almost any colour desired, although this will also depend on the base colour of the fabric as the colour of this could change the quality of the colours printed. The design I chose only used one colour so the colour density setting was on 75% due to the slightly darker background. Once you have changed the relevant settings you simply press print.
Step 3
Once sent from the computer it will take a short while to copy over the details to the printer. Once they have transferred, the screen on the SC-F2000 will light up and instruct you on your next steps. Press the button the printer instructs you to and your fabric will be taken into the printer. On top of the SC-F2000 there is a transparent area, which allows you to see your design come to life. Once complete the newly printed design will return to its original place outside of the printer. If you have chosen a setting that requires a double print, a timer will begin on the printing screen to advise you how long you have left of your selected pause time. Once complete simply take your print and leave it to dry. Heat pressing the fabric is a precaution I take to ensure the pattern is set. I was really pleased with the outcome of the suede design, the linear pattern is simple but the texture of the material adds to the design.
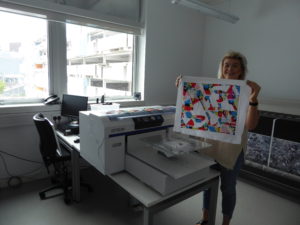
Experimentation and exploration
The SC-F2000 is a fantastic piece of equipment to explore different printing techniques. Printing onto loose fabrics compared to on a roll means that you can layer up using different techniques. For the sunflower print pictured I experimented using a pause of two minutes in the printing process. This gave me enough time to place a laser cut fabric sample over the top. When the fabric went under to print again the stencil on top obstructed some areas of printing. This gave a playful feel to the print. This is just one way in which I’ve experimented with the F2000.
Having only been able to use the printer in two of my projects so far I plan to experiment more freely in my third year to create some experimental results for my final collection.
For anyone looking to use this printer I would advise that you spend some time really getting to grips with the different settings the printer can perform. Each of the different settings can completely transform the way a design will print. Knowing its capabilities will then allow anyone to explore material qualities and layering techniques in more depth. There are so many capabilities with the SC-F2000 that I feel I haven’t yet used it to its full potential. One technique I will look into using is the merging of traditional screen printing with digital printing. Screen printing onto a fabric and then digitally printing could produce some great results as well as adding in the use of flock, puff binder etc. I would definitely recommend the SC-F2000 for designers who like to push the boundaries of printed designs.
Abi places her puzzle pieces onto the T shirt
Third year student Abi Southall describes how she used the SC-F2000 to its advantage to create a design full of colour and geometric shapes.
I chose to study Textile Design at Birmingham City University because of the fantastic facilities, including the print equipment and the knowledge of the tutors and technicians. The course itself is fantastic in helping to build on previous knowledge and expertise in each module developing skills and abilities to use in the textile design industry using the latest print technology.
One of my designs was based upon our inner child, full of vivid colour, low tech fun geometric shapes and designs. The design provided a cut and paste attitude with an energetic sophisticated edge and was a collaborative piece of work with ColorHive.
Step 1
Firstly I ironed and fixed my fabric onto the SC-F2000. I then arranged my hand-made puzzle pieces onto it, which were made out of thin mdf and card to create abstract geometric shapes, and dot cut out stencils, made with a hole punch. These were fixed with small pieces of double sided tape so they didn’t lift during printing.
Step2
The ink setting was changed to double strike, which prints the pattern twice with a pause in-between. I added a one minute pause in-between so I could take my puzzle pieces and cut outs off. I then uploaded my designs to Garment Creator and resized to how big I wanted it to be printed onto the fabric. For the design pictured I chose to print the whole area.
Step 3
I then sent the design to print. I pressed the print button on the SC-F2000 and watched my design print through the transparent area.
Step 4
During the one minute pause I removed some puzzle pieces, exposing lighter areas in my print design for contrast when the printing resumed.
Step 5
On completion of the second layer of print the process is finished by taking the puzzle and dot cut stencils off, revealing block out abstract geometric shapes and clusters of dots in geometric shapes. I then waited for the print to dry and heat pressed it afterwards.
Endless possibilities
The SC-F2000 allowed me to achieve my desired outcome and more. It exceeded my expectations, in fact. The only thing that I would have done differently during this process would have been to keep experimenting with the cut outs, stencils and puzzle pieces I made for it.
The outcome of the print after Abi has removed the puzzle pieces and dot cut out stencils
There are endless possibilities to experiment with to ensure you can achieve the design outcome you are looking for. The technology and range of applications means you can try out something that is bespoke and unique to you as a designer. The techniques you can try out on the SC-F2000 include printing designs over other designs, using stencils and printing over embroidery/ yarns.
I find the fact that you can layer your prints up on the platen particularly useful. There are many different ink settings which add different styles and options to your design. You can also use stencils and cut outs on them to create patterns within patterns.
The SC-F2000 is a fantastic printer and I recommend it for use in the textile design industry and universities. It gives you endless possibilities through layering/ stencils/ printing over embroidery and materials which gives you great opportunity for further experimentation with your designs revealing exciting and sometimes, unexpected outcomes.
To offer a word of advice I would say try all of the different ink settings as they all give you different outcomes when printed which can add to your designs and patterns. Allow some time for experimentation and design development.
 Printwear & Promotion The Total Promotional Package
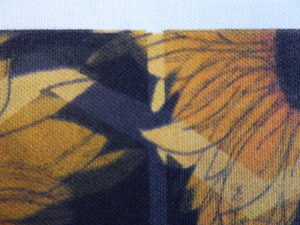 The SC-F2000 is a fantastic piece of equipment to explore different printing techniques. Printing onto loose fabrics compared to on a roll means that you can layer up using different techniques. For the sunflower print pictured I experimented using a pause of two minutes in the printing process. This gave me enough time to place a laser cut fabric sample over the top. When the fabric went under to print again the stencil on top obstructed some areas of printing. This gave a playful feel to the print. This is just one way in which I’ve experimented with the F2000.