 Printwear & Promotion The Total Promotional Package

The rise of direct to garment printing has offered many new opportunities for decorators, making printing quantity-one affordable. To support this growing trend, Wilcom has developed a feature called Capture Virtual Decoration Bitmap that exports traditional embroidery files into a printable file that supports any direct to garment or printing machine.
This feature creates a high-resolution .PNG of the embroidery stitching, with a transparent background to support printing on dark colours, and simulates real stitching using Wilcom’s TrueView technology. Visually, the printed embroidery looks almost indistinguishable from real embroidery, but has the added advantage of being smooth to the touch. This method of decorating is ideal for sports and performance wear, which typically avoids large embroidery designs that make the garment bulky and thick.
Wilcom’s latest release, EmbroideryStudio e4.2, includes this feature as standard in the embroidery software, and now supports higher resolutions up to 600dpi.
It’s as simple as 1, 2, 3…
Step 1 – Create
Digitise your design as normal or use the auto-digitising tool to create the design. No need to consider stitch count, as this design will not be stitched. This gives digitisers an opportunity to use a variety of stitch techniques, providing plenty of texture.
Step 2 – Export
Once the design is digitised, it’s as simple as exporting. The latest EmbroideryStudio e4.2 gives you the ability to export the design up to 600dpi resolution. A print-ready .PNG file is produced. The virtual embroidery file has a transparent background making it versatile for print on any colour background.
Step 3 – Print
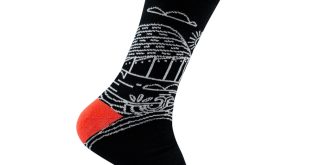
The finished product
Keep in mind, DTG is generally best on natural fibres like cotton or bamboo. You can print on cotton/polyester fabrics. However, some issues may arise when the fabric is over 30% polyester. In this case, treatment of the garment is required to ensure the ink will bond. As with dark fabrics, you need to pre-treat the garment with a special solution that allows the white ink to bond to the fabric. The white is printed first, followed by the colours.
At a recent tradeshow in Sydney, Australia, Wilcom showcased printing an embroidery design on a Ricoh Ri 6000 DTG machine.
The finished result was a soft, virtual embroidery design that looks like the real deal, and prints in a matter of seconds, and at a much lower cost than embroidery. In this example, the ink to print this design costs only $0.05, with a print time of approximately 30 seconds.
Enjoy, and happy stitching! (or printing!)