 Printwear & Promotion The Total Promotional Package
In direct to garment printing, printing on polyester fabric has always been a sort of ‘Holy Grail’ and here BRIAN WALKER of developers, i-Group Technologies, explains what new step has been taken to reach this goal.
Up until recently, polyester printing with DTG has been limited to CMYK only on light or white coloured polyester shirts. Even then the wash results were alright but not spectacular.
However, in our constant pursuit of perfection, the industry has taken another step closer to the Holy Grail of DTG printing – white inks on black polyester fabrics. We’re not there yet, but the results of our process speak volumes about the direction of the DTG market.
Utilising the Image Armor Light Shirt formula, we have been able to achieve commercially acceptable white ink prints on mid-coloured polyester fabrics. The process is relatively straight forward, but we are expecting the RIP manufacturers to follow suit to give end users this ability from within the RIP itself to make it much easier to accomplish. Currently we have to do a little ‘workaround’ to make the magic happen.
Step one: Pretreat the shirt
Pretreat the shirt using Image Armor Light Shirt Formula. We utilised the Sport-Tek ST350 series 100% poly performance shirt (more on this in a minute) and applied 24g of pretreatment on the polyester shirt. The PT was then cured at 166°C for two 20 second presses utilising brown Kraft type paper. I would not recommend using teflon as it will definitely shine up the shirt too much. The platen was raised to allow steam to escape and create a much more thorough and dry cure in between presses. A Stahl’s Hotronix Air Fusion heat press with 70psi was used to dry the pretreatment. A little experimentation might find that slightly more PT may help.
A note about polyester shirts: We must note here at this point that some polyester shirts are better than others for printing. We did see some discoloration of the polyester fabric on the yellows and greys with the Sport-Tek ST350’s (it was not massive but some might find it unacceptable). However, we’ve seen other colours that do not discolour. Sometimes this discolouration comes out in the wash, other times it does not. You’ll need to do some research on what polyester brand and shirts work best for your shop.
Step two: The underbase is key
Printing the underbase is key to getting these polyester shirts with white ink to print correctly. Normally some RIPs will print a solid under base of white under the entire design on a gold shirt like in our example above. However, for technical reasons you will get poor results if you do that with this process.
What you need to do is act as though you are printing the design (specifically the underbase) on a black shirt. If your RIP allows you to utilise the black of the shirt color for the black in the printed design, then the RIP will not print any white ink where black is in the design (the shirt would be the black ink of the design). This process generally creates awesome fades on the DTG prints. This is also exactly what we want for our mid and light coloured polyester shirts as far as the underbase.
This may sound counter-intuitive, but black ink does not technically need an under base beneath it to look good on any shirt. You can see on our grey shirt to the right, what this white under base looks like when printed. Notice where black would be in the image there is no white under base – this is extremely important. Failure to ensure the black does not have any white underbase under it will result in a less than desirable final print on polyester fabrics.
Note, your RIP must allow you to only print this under base. You do not want to print the CMYK associated with this RIP’d design. Why? Again, we are not printing on a black shirt. That’s why. So, you must be able to separately print the under base from the CMYK.
It might be noted at this time that the more white ink your printer can put down at this stage is crucial. Set it to a maximum amount of white ink. If you try to go back and print the under base again (as in a 2x under base) there will be massive bleeding of moisture around the edges of where the white ink and polyester meet. Try to bump up the white underbase so it is dropping as much white ink as possible without over saturation to achieve a solid white layer of ink film.
Step three: Print the CMYK and highlight white
Now, we need to take the same exact image and print it in exactly the same place but with a CMYK + white highlight option. In our RIP we utilized the CMYK + white highlight as though we were printing on a dark coloured shirt (such as gold). This would normally print a solid white underbase (which we do not use) and then the CMYK as normal with the highlight white.
What this achieves is allowing the black ink to print directly onto the garment since there should be no white under base in those areas. And, we also get a highlight white to help augment the optical brightness of the white ink.
Please note, you may need to reduce the white highlight percent lower to keep the CMYK (especially black ink) from mixing with the wet white highlight being printed. In our case, we utilised a 50% highlight and 100% white under base (higher values may work – some experimentation will be required). The CMYK was printed at a standard 65% setting. Your printer and ink set and polyester shirts might require some testing on settings, but it is worth it.
Once the shirt is printed, we have to heat set the ink.
Step four: Cure the ink
Here is where it can get sticky. We strictly adhered to Duponts technical sheet of the cure time for their Artistri inks. 120 seconds in the heat press at 170°C. I would not recommend higher temps due to the shirt dyes sublimating through the white ink. This seems to give an incredible great balance to wash ability and optical brightness, even on gold 100% polyester fabrics.
Our curing parameters we used a Hotronix Fusion heat press (non-pneumatic) at a pressure of 3-4 on the digital display. Do not use too much pressure and kill the inks by pushing them into the shirt.
Now what?
The shirt is printed, cured, and ready to roll. We’ve found excellent washability with the white ink and CMYK prints utilising this technique without having to purchase any additional or different ink sets while at the same time utilising our popular Image Armor Light Shirt Formula. This reduces the number of pretreatments needed to achieve great results with all of your current equipment.
Now, since you understand our process, a little experimentation on your end and happy customers will make the hard work on this end all pay off.
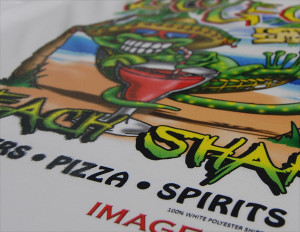
Update: 5x wash testing
To the left is a picture of 5x wash testing. The picture is a 5x wash in hot/cold and drying hot. Note the close up inset of the picture. The ink is wrapped around the fibers of the polyester and interweaved – so it is not going anywhere. The drop in initial color vibrancy is maybe 5% like expected even on cotton but there is absolutely no hand or feel to the print at all at this point.
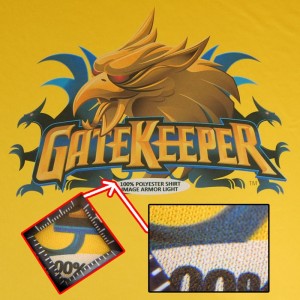
Update: 10x wash testing

To the left is a picture and a close up of the same shirt as above, washed and dried 10 times. There is still no noticeable difference between this and the 5x washing. The closeup reveals a better revelation of the white ink still wrapped around the individual fibers of the polyester shirt. The image is still extremely commercially acceptable after 10x washes.
For more information email info@imagearmorpt.com or visit www.imagearmorpt.com